
Have you ever tasted a dessert so creamy and delicious that it actually made someone cry tears of joy? It might sound like a fairy tale, but a great Cherry Cheesecake has the power to turn any ordinary day into a massive celebration. Most people think making a professional-quality cheesecake at home is too hard, but what if the secret to the best dessert of your life was simpler than you ever imagined?
Why This Cherry Cheesecake Is Special
Print
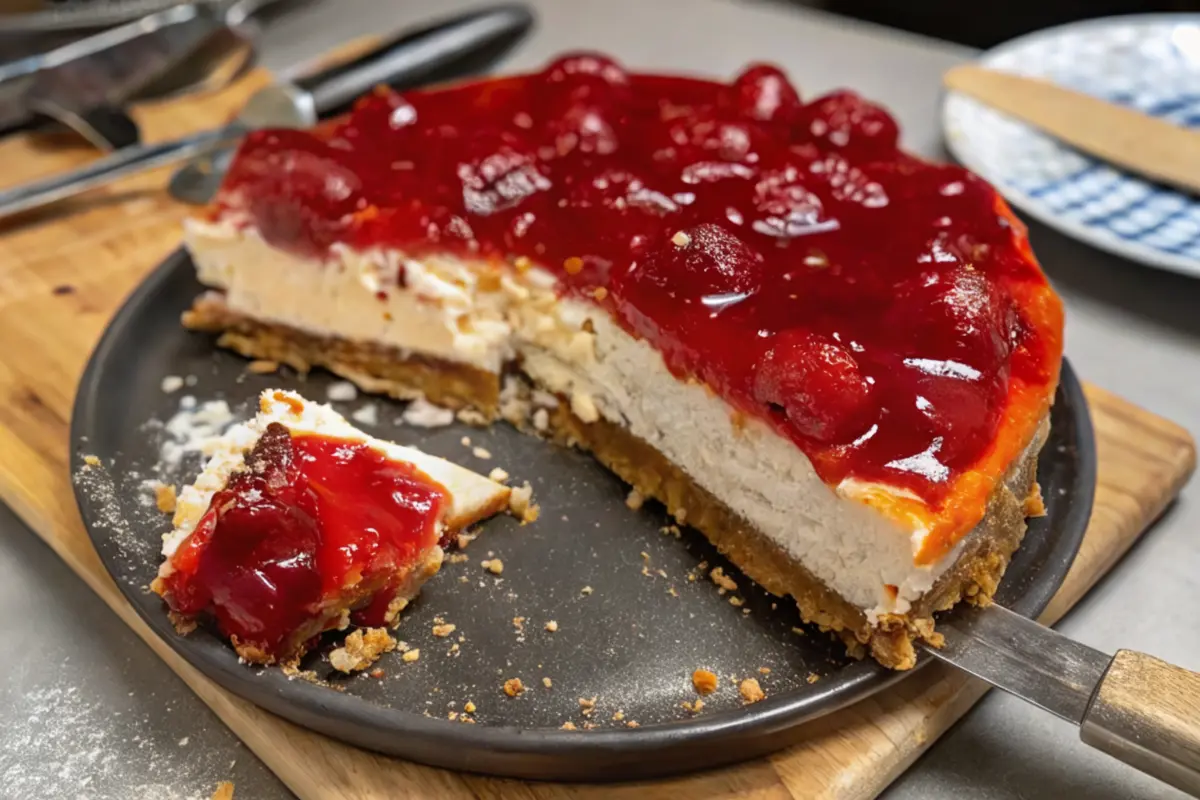
The Perfect Thick-Crust Cherry Cheesecake
- Total Time: 8 hours (includes chilling)
- Yield: 12 servings 1x
- Diet: Vegetarian
Description
Have you ever tasted a dessert so creamy and delicious that it actually made someone cry tears of joy? This Cherry Cheesecake features an extra-thick, buttery graham cracker crust and a velvety smooth filling topped with glossy cherries. It is the ultimate foolproof dessert for celebrations or a special Sunday treat.
Ingredients
- For the Thick Graham Cracker Crust:
- 3 cups graham cracker crumbs (about 20–24 full sheets)
- 3/4 cup unsalted butter, melted
- 1/4 cup granulated sugar
- 1/2 teaspoon ground cinnamon
- For the Creamy Filling:
- 32 oz (4 blocks) full-fat cream cheese, softened
- 1 cup granulated sugar
- 1 cup sour cream, room temperature
- 1 teaspoon pure vanilla extract
- 1/2 teaspoon lemon juice
- 4 large eggs, room temperature
- For the Topping:
- 21 oz canned cherry pie filling
Instructions
- Prepare the Base: Preheat oven to 325°F. Mix graham cracker crumbs, sugar, cinnamon, and melted butter. Press firmly into the bottom and halfway up the sides of a 9-inch springform pan. Bake for 10 minutes and cool.
- Mix the Filling: Beat softened cream cheese and sugar until smooth. Add sour cream, vanilla, and lemon juice; mix well.
- Add Eggs Gently: On low speed, add eggs one at a time, mixing just until the yellow disappears. Do not over-mix to avoid cracks.
- Bake with Water Bath: Wrap the pan in heavy-duty foil and place in a roasting pan with 1 inch of hot water. Bake for 60-70 minutes until edges are set but the center jiggles slightly.
- Slow Cool: Turn off oven and crack the door for 1 hour. Remove and let reach room temperature on the counter before refrigerating for at least 6 hours.
- Assemble: Release the springform latch and pour cherry pie filling over the top before serving.
Notes
Ensure all dairy ingredients are at room temperature for a lump-free batter. Resist the urge to skip the water bath; it is the secret to a crack-free surface. For clean slices, dip your knife in hot water and wipe it dry between every cut.
- Prep Time: 30 minutes
- Cook Time: 1 hour 10 minutes
- Category: Dessert
- Method: Baking
- Cuisine: American
Nutrition
- Serving Size: 1 slice
- Calories: 480
- Sugar: 32g
- Sodium: 310mg
- Fat: 34g
- Saturated Fat: 20g
- Carbohydrates: 38g
- Fiber: 1g
- Protein: 7g
- Cholesterol: 135mg
This recipe is not your average store-bought dessert. What makes it stand out is the balance between the extra-thick, buttery graham cracker crust and the velvety smooth cream cheese filling. Many recipes skimp on the crust, but we believe the crunch is just as important as the cream.
This recipe is perfect for beginners because it uses a foolproof method to avoid cracks. While it takes some time to chill, the actual work you have to do is quite simple.
- Difficulty Level: Medium (Easy steps, just requires patience)
- Prep Time: 30 minutes
- Bake Time: 1 hour
- Chill Time: 6 to 8 hours (Overnight is best)
Essential Ingredients and Measurements
To get the best results, make sure your cold ingredients like eggs and cream cheese are at room temperature before you start. This ensures a smooth batter without any lumps.
For the Thick Graham Cracker Crust
- 3 cups graham cracker crumbs (about 20 to 24 full sheets)
- 3/4 cup unsalted butter, melted
- 1/4 cup granulated sugar
- 1/2 teaspoon ground cinnamon
For the Creamy Filling
- 32 ounces full-fat cream cheese (4 blocks), softened to room temperature
- 1 cup granulated sugar
- 1 cup sour cream, room temperature
- 1 teaspoon pure vanilla extract
- 1/2 teaspoon lemon juice
- 4 large eggs, room temperature
For the Cherry Topping
- 21 ounces canned cherry pie filling (one standard can)
- Optional: 1/4 teaspoon almond extract to stir into the cherries for extra flavor
Substitutions and Variations
If you do not have graham crackers, you can use crushed vanilla wafers or digestive biscuits. If you want a gluten-free version, simply swap the crackers for your favorite gluten-free cookie brand. For a lighter version, you can use low-fat sour cream, but full-fat cream cheese is highly recommended for the right texture.
Step-by-Step Instructions

Step 1: Prepare the Oven and Pan
Preheat your oven to 325 degrees Fahrenheit. Take a 9-inch springform pan and grease the sides with a little bit of butter or non-stick spray. A springform pan is essential because the sides pop off, leaving your cake intact.
Step 2: Make the Thick Crust
In a medium bowl, mix the graham cracker crumbs, sugar, and cinnamon. Pour the melted butter over the mixture and stir with a fork until it looks like wet sand.
Press the mixture into the bottom of your pan and about halfway up the sides. Use the bottom of a heavy measuring cup to pack it down tightly. This prevents the crust from crumbling when you cut the cake later. Bake the crust for 10 minutes, then set it aside to cool.
Step 3: Mix the Filling
In a large bowl, beat the softened cream cheese and sugar together using a hand mixer or a stand mixer on medium speed. Mix until it is completely smooth.
Add the sour cream, vanilla extract, and lemon juice. Mix again until combined.
Step 4: Add the Eggs
Turn your mixer to the lowest speed. Add the eggs one at a time, mixing just until the yellow disappears.
Cooking Tip: Do not over-mix the eggs. If you beat too much air into the eggs, the cheesecake will puff up in the oven and then sink and crack as it cools.
Step 5: The Water Bath Method
To keep the cheesecake moist and prevent cracking, wrap the outside of your springform pan tightly in two layers of heavy-duty aluminum foil. Place the pan inside a larger roasting pan. Pour about one inch of hot water into the roasting pan. This creates steam that cooks the cake gently.
Step 6: Baking
Carefully place the pans in the oven. Bake for 60 to 70 minutes. The edges should look set and firm, but the center should still have a little bit of a jiggle, like Jell-O.
Step 7: The Cooling Process
Turn off the oven and crack the door open just a few inches. Let the cheesecake sit inside for one hour. This slow cooling prevents the cake from shrinking too fast. After an hour, take it out, remove the foil, and let it sit on the counter until it reaches room temperature.
Assembly and Presentation
Once the cheesecake is at room temperature, run a thin knife around the edge of the pan to loosen it. Cover it with plastic wrap and put it in the fridge for at least 6 hours.
When you are ready to serve, release the latch on the springform pan and lift the sides away. Pour the cherry pie filling over the top of the cake. Spread it out evenly, leaving a small border around the edge so the white cheesecake shows through.
For a beautiful presentation, you can whip some heavy cream and pipe small stars of frosting around the edge of the cherry topping. Use a sharp knife dipped in hot water to get those perfect, clean slices.
Storage and Make-Ahead Tips
You can easily make this Cherry Cheesecake two days before you need it. In fact, the flavor often gets better after sitting in the fridge.
- Fridge: Store any leftovers in an airtight container or cover the pan tightly with foil. It will stay fresh for up to 5 days.
- Freezer: You can freeze the cheesecake without the cherry topping. Wrap the plain cake in plastic wrap and then aluminum foil. It stays good for up to 3 months. Thaw it in the fridge overnight before adding the cherries and serving.
- Note: Do not reheat cheesecake. It is meant to be enjoyed cold.
Recipe Variations
While cherry is the classic choice, you can use this base recipe for many different flavors:
- Chocolate Chip: Fold one cup of mini chocolate chips into the batter before baking.
- Turtle Style: Use a chocolate cookie crust and top the finished cake with caramel sauce, chocolate drizzle, and pecans.
- Fresh Berry: Instead of canned filling, use fresh strawberries or blueberries tossed in a little bit of sugar.
- Lemon Swirl: Add extra lemon zest to the batter for a bright, citrusy kick.
Conclusion
Making a Cherry Cheesecake from scratch is a wonderful way to show people you care. Whether you are celebrating a birthday or just want a special Sunday treat, this thick-crust version is sure to be a hit. Do not be afraid of the water bath or the long cooling time. Those steps are what make the cake perfect. Experiment with different toppings and find the version your family loves the most.
FAQs
Can I make this without a water bath?
You can, but the cake is more likely to crack on top and might have a drier texture. If you skip the water bath, place a pan of water on the oven rack below the cheesecake to keep the air moist.
Why did my cheesecake crack?
Cracks usually happen because the eggs were over-mixed, the oven was too hot, or the cake cooled down too quickly. Following the slow cooling steps in this recipe will help you avoid this.
Are there any health benefits to cheesecake?
While cheesecake is a dessert, it does provide calcium and protein from the cream cheese and eggs. To make it slightly healthier, you can serve it with fresh cherries instead of syrupy pie filling to reduce the sugar.
How do I know when it is done baking?
Give the pan a gentle nudge. The edges should be solid, but the middle circle (about 2 or 3 inches wide) should still wobble slightly. It will firm up completely as it chills in the refrigerator.
Can I use homemade cherry sauce?
Yes. You can simmer fresh or frozen cherries with a little sugar, lemon juice, and cornstarch until thickened, then let it cool before pouring it over the cake.


