

Have you ever wondered if it is truly possible to bake a gourmet-style cookie using only five simple ingredients without using any eggs or wheat flour?
It sounds like a kitchen miracle, but these soft and chewy Gluten-Free Marble Cookies prove that you do not need a pantry full of complicated supplies to create something spectacular. Most people believe that gluten-free baking requires expensive gums, multiple types of flour, and a lot of patience. However, this recipe breaks all those rules. It is designed for anyone who wants a delicious treat that looks like it came from a professional bakery but can be made in a single afternoon with minimal effort.
Why This Recipe Is Special
Print
Soft & Chewy Gluten-Free Marble Cookies (Only 5 Ingredients!)
- Total Time: 22 minutes
- Yield: 12 cookies 1x
Description
Have you ever wondered if it is truly possible to bake a gourmet-style cookie using only five simple ingredients without using any eggs or wheat flour? These soft and chewy Gluten-Free Marble Cookies prove that you do not need a pantry full of complicated supplies to create something spectacular. Perfect for busy weeknights or a healthy weekend treat.
Ingredients
- 2 cups super-fine almond flour
- 1/2 cup maple syrup (or honey)
- 1/4 cup melted coconut oil (or melted butter)
- 1 teaspoon vanilla extract
- 2 tablespoons unsweetened cocoa powder
Instructions
- Preheat and Prep: Preheat your oven to 350 degrees Fahrenheit. Line a large baking sheet with parchment paper to prevent sticking.
- Mix the Base Dough: In a large mixing bowl, stir together the almond flour, maple syrup, melted coconut oil, and vanilla extract until a soft, thick dough forms.
- Divide and Flavor: Split the dough into two equal portions. Leave one as vanilla. In the other portion, knead in the cocoa powder until it is a solid dark brown.
- Shape the Cookies: Scoop one tablespoon of vanilla dough and one tablespoon of chocolate dough. Press them together and roll into a ball between your palms to create the marble effect.
- Flatten and Bake: Place the balls on the baking sheet and press down gently with your palm to flatten into thick discs. Bake for 12 minutes.
- Cool Completely: Let the cookies cool on the baking sheet for at least 15 minutes to allow them to firm up before moving them.
Notes
Resist the urge to move the cookies while they are hot; they need to cool to set properly. For a gourmet look, sprinkle a tiny pinch of flaky sea salt on top right after baking. If the chocolate dough feels too dry, add a tiny splash of maple syrup.
- Prep Time: 10 minutes
- Cook Time: 12 minutes
- Category: Dessert
- Method: Baking
- Cuisine: American
Nutrition
- Serving Size: 1 cookie
- Calories: 165
- Sugar: 9g
- Sodium: 5mg
- Fat: 12g
- Saturated Fat: 5g
- Unsaturated Fat: 7g
- Trans Fat: 0g
- Carbohydrates: 13g
- Fiber: 2g
- Protein: 4g
- Cholesterol: 0mg
This recipe is a lifesaver for busy families, people with food sensitivities, or anyone who just realized they are out of eggs. What makes these Gluten-Free Marble Cookies stand out is the perfect balance of chocolate and vanilla in every bite. They have a beautiful two-tone look that makes them feel fancy enough for a party, yet they are simple enough for a Tuesday night snack.
- Time Requirement: 10 minutes of prep and 12 minutes of baking.
- Difficulty Level: Very Easy. If you can roll dough into a ball, you can make these cookies.
- Dietary Perks: Naturally egg-free, gluten-free, and easily made dairy-free or vegan.
Essential Ingredients
To keep things simple, we are using five core ingredients. These items are likely already in your kitchen.
- 2 cups Almond Flour: This provides the soft, chewy base and a boost of healthy fats. Make sure to use “super-fine” almond flour rather than almond meal for the smoothest texture.
- 1/2 cup Maple Syrup: This acts as our natural sweetener and provides the moisture needed to bind the dough since we aren’t using eggs.
- 1/4 cup Melted Coconut Oil: This gives the cookies a rich, buttery mouthfeel. You can also use melted butter if you do not need the recipe to be dairy-free.
- 1 teaspoon Vanilla Extract: This brings out the warmth in the “vanilla” side of the cookie.
- 2 tablespoons Unsweetened Cocoa Powder: This is what transforms half of our dough into the chocolate marble section.
Substitutions and Variations:
- Sweetener: You can use honey instead of maple syrup, though the cookies will be a bit more golden and have a distinct honey flavor.
- Nut-Free: If you have a nut allergy, you can try using sunflower seed flour, though it may turn the cookies slightly green due to a natural reaction with leavening agents (not used here, but common in baking).
- Oil: If you do not like the taste of coconut, use refined coconut oil (which has no flavor) or a light olive oil.
Step-by-Step Instructions
Baking Gluten-Free Marble Cookies is a fun process that feels like a craft project. Follow these steps to ensure a perfect bake every time.
1. Preheat and Prep Start by preheating your oven to 350 degrees Fahrenheit. Line a large baking sheet with parchment paper. This is very important for gluten-free cookies because they can be delicate when they first come out of the oven. The parchment paper prevents sticking.
2. Mix the Base Dough In a large mixing bowl, stir together the almond flour, maple syrup, melted coconut oil, and vanilla extract. Stir until a soft, thick dough forms. It should feel a bit like playdough. If the dough feels too wet, add one extra tablespoon of almond flour.
3. Divide the Dough Split your dough into two equal portions. Leave one portion in the bowl; this is your vanilla base. Move the other portion to a separate small bowl.
4. Create the Chocolate Dough Add the cocoa powder to the second bowl of dough. Use a spoon or your hands to knead the cocoa powder into the dough until the color is solid dark brown. If the chocolate dough feels too dry after adding the cocoa, add a tiny splash (half a teaspoon) of maple syrup to help it come together.
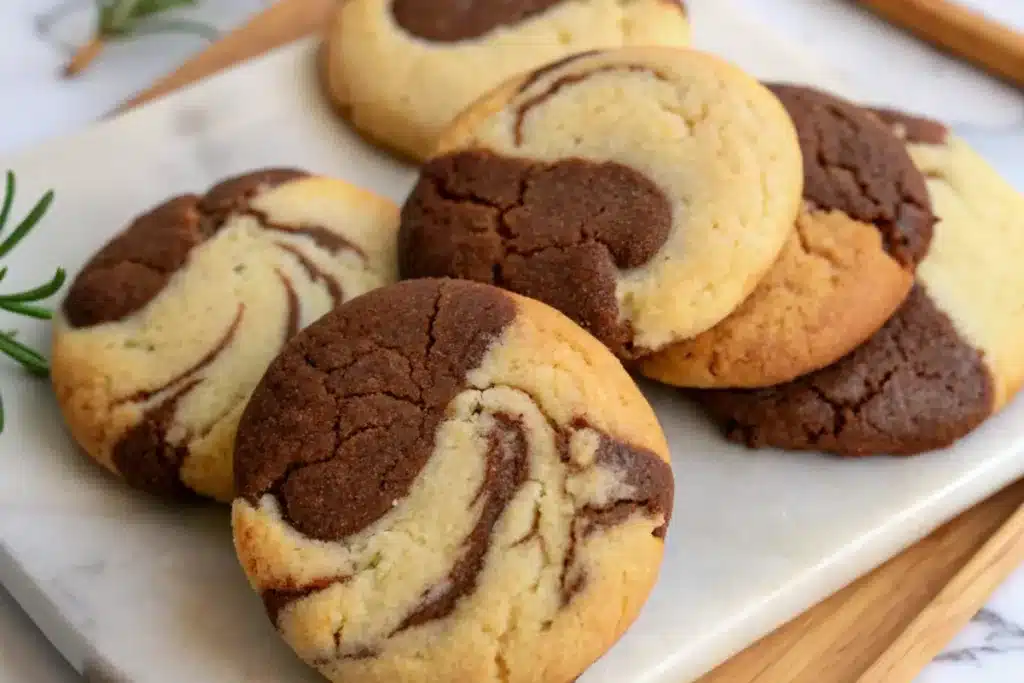
5. Shape the Cookies Scoop about one tablespoon of vanilla dough and one tablespoon of chocolate dough. Press them together and roll them into a ball between your palms. This creates that beautiful “marble” or “half-and-half” look seen in the photo.
6. Flatten and Bake Place the balls on the baking sheet about two inches apart. Press down gently with the palm of your hand to flatten them into a thick disc shape. These cookies do not spread very much on their own, so the shape you give them now is the shape they will stay.
Assembly and Presentation
The “assembly” of these cookies is where you get to be creative. To get a perfect marble effect, do not over-mix the two colors. The goal is to see clear sections of dark chocolate and light vanilla.
Tips for Presentation:
- The Half-and-Half Look: Instead of swirling, simply press a ball of chocolate dough against a ball of vanilla dough for a clean, modern look.
- The Swirl: For a more chaotic “marble” look, roll the two colors into long ropes, twist them together, and then roll that twist into a ball.
- Finishing Touch: Sprinkle a tiny pinch of flaky sea salt on top right after they come out of the oven. This makes the chocolate flavor pop and looks very elegant.
Storage and Make-Ahead Tips
Because these cookies are made with almond flour and coconut oil, they stay moist longer than traditional flour cookies.
- Room Temperature: Store in an airtight container for up to 3 days.
- Fridge: These cookies actually taste amazing when cold! Store them in the fridge for up to 7 days. They will become slightly firmer and more “fudge-like.”
- Freezing: You can freeze the baked cookies for up to 3 months. Just thaw them at room temperature for an hour before eating.
- Make-Ahead Dough: You can make the dough a day in advance. Keep it in the fridge wrapped in plastic wrap. Let it sit on the counter for 20 minutes before rolling so the coconut oil softens back up.
Recipe Variations
Once you master the basic Gluten-Free Marble Cookies, you can try these fun twists:
- Peanut Butter Marble: Instead of coconut oil, use creamy peanut butter in the vanilla half. Peanut butter and chocolate is a classic combination.
- Chocolate Chip Marble: Fold mini chocolate chips into the vanilla section for extra texture.
- Peppermint Marble: Add a drop of peppermint extract to the chocolate half for a holiday-themed treat.
- Almond Crunch: Press a whole almond into the center of each cookie before baking to add a nice crunch.
Conclusion
Baking does not have to be a stressful or messy chore. With these Gluten-Free Marble Cookies, you get a healthy, allergy-friendly snack that tastes like a decadent dessert. The combination of the almond base and the rich cocoa ensures that no one will even miss the flour or the eggs. I encourage you to get into the kitchen and experiment with the shapes and swirls. Whether you share them with friends or keep them all for yourself, these 5-ingredient wonders are sure to become a new favorite.
FAQs
Are these cookies healthy?
Yes! They are much higher in protein and fiber than traditional cookies because they use almond flour instead of white flour. They are also sweetened with maple syrup, which is a natural sugar.
Why are my cookies falling apart?
Gluten-free cookies are very soft when they first come out of the oven. You must let them cool completely on the baking sheet for at least 15 minutes. As the coconut oil cools, it acts like a glue to hold the cookie together.
Can I use a different flour?
This specific recipe is designed for almond flour. Replacing it with coconut flour or all-purpose flour will change the moisture levels significantly, and the cookies may become too dry or crumbly.
Do I need an electric mixer?
No. This dough is very easy to mix by hand with a sturdy spoon or even your hands.
Can I make these sugar-free?
You can use a liquid sugar-free sweetener like monk fruit syrup, but avoid using granulated sweeteners as they may change the texture and prevent the dough from sticking together.


