

Have You Ever Dreamed of a Dessert That Tastes Like a Gourmet Candy Bar but Is Actually Good for You?
We have all been there. It is late at night and you want something sweet. You look in the pantry but all you see are sugary snacks that make you feel tired later. What if you could make something at home that tastes like a million dollars but uses simple ingredients? Today we are making No-Bake Chocolate Caramel Bars with Toasted Nut Crunch. This recipe is a total game changer. It is sweet and salty. It is crunchy and smooth. Most importantly it is incredibly easy to make. You do not even have to turn on your oven.
Print
No-Bake Chocolate Caramel Bars with Toasted Nut Crunch
- Total Time: 1 hour 20 minutes
- Yield: 16 bars 1x
Description
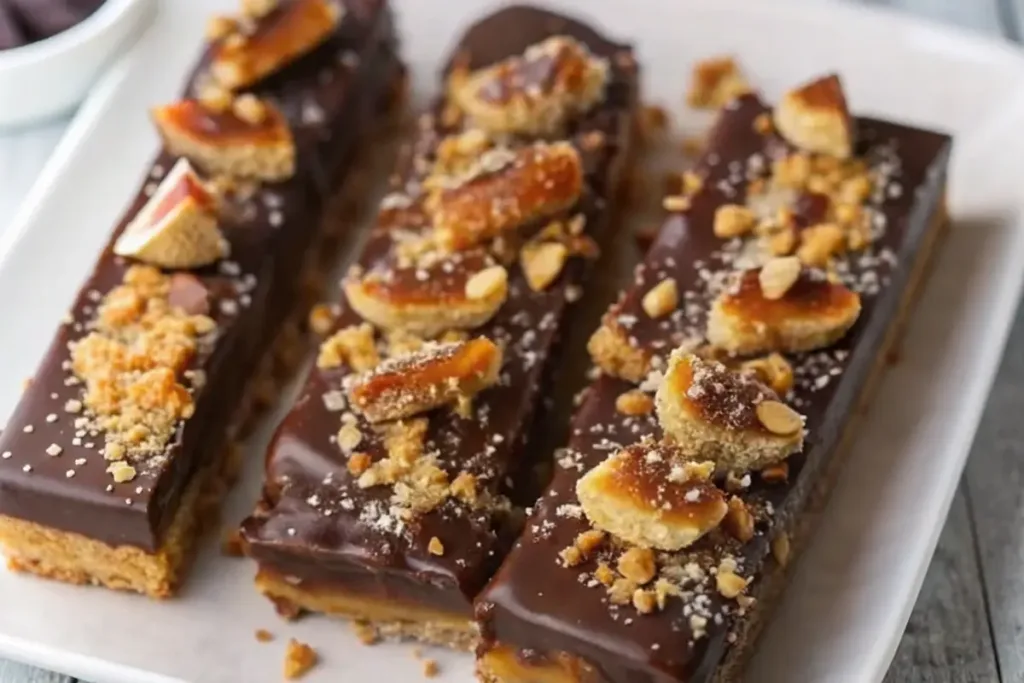
These No-Bake Chocolate Caramel Bars are a decadent, multi-layered treat featuring a crunchy graham cracker base, a silky almond butter caramel center, and a rich dark chocolate topping finished with toasted walnuts and sea salt. Perfect for satisfying your sweet tooth without ever turning on the oven.
Ingredients
- The Base:
- 2 cups graham cracker crumbs
- 1/2 cup unsalted butter, melted
- 1/4 cup honey
- The Caramel Heart:
- 1 cup almond butter
- 1/2 cup maple syrup
- 1/3 cup coconut oil, melted
- 1 teaspoon vanilla extract
- The Topping:
- 1 1/2 cups dark chocolate chips
- 2 tablespoons coconut oil
- 1/2 cup toasted walnuts, chopped
- 1 tablespoon flaky sea salt
Instructions
- Build the Foundation: Combine graham cracker crumbs, melted butter, and honey in a bowl. Press the mixture firmly into a parchment-lined 8×8 inch square pan to create an even base.
- Create the Caramel Heart: In a separate bowl, whisk together almond butter, maple syrup, melted coconut oil, and vanilla until silky smooth and glossy. Pour this mixture over the crust and spread to the edges.
- Prepare the Chocolate Blanket: Melt the dark chocolate chips and coconut oil in the microwave in 30-second intervals, stirring until smooth.
- Layer and Crunch: Pour the melted chocolate over the caramel layer. Immediately sprinkle with chopped toasted walnuts and flaky sea salt.
- Chill to Set: Place the pan in the freezer for at least 1 hour or the refrigerator for 3 hours until completely firm.
- Slice and Serve: Lift the bars out using the parchment paper. Use a warm, sharp knife to slice into long rectangular bars.
Notes
For a clean cut, run your knife under hot water and wipe it dry between every slice. If you have a nut allergy, swap the almond butter for sunflower seed butter and skip the walnut topping. Store these in an airtight container in the fridge for up to two weeks.
- Prep Time: 20 minutes
- Cook Time: 0 minutes
- Category: Dessert
- Method: No-Bake
- Cuisine: American
Nutrition
- Serving Size: 1 bar
- Calories: 280
- Sugar: 14g
- Sodium: 110mg
- Fat: 19g
- Saturated Fat: 9g
- Unsaturated Fat: 8g
- Trans Fat: 0g
- Carbohydrates: 26g
- Fiber: 3g
- Protein: 5g
- Cholesterol: 15mg
This recipe is special because it feels fancy without the hard work. Many people think they need to be a professional baker to make layers of caramel and chocolate. That is not true. This dish takes about 20 minutes of active work. The rest of the time is just letting it sit in the fridge.
On a scale of one to ten for difficulty this is a two. If you can stir a spoon and press a crust into a pan you can do this. While these are technically caramel bars they share a secret with Greek Yogurt Brownies. That secret is finding ways to make treats feel light and creamy without being too heavy. Whether you are making these for a school party or a quiet night at home they are sure to be a hit.
Essential Ingredients
You only need a few things from the grocery store to get started. Here is exactly what you need to measure out.
For the Base Layer:
- 2 cups of graham cracker crumbs (about 12 to 14 full sheets)
- 1/2 cup of unsalted butter melted
- 1/4 cup of honey or maple syrup
- 1 pinch of salt
For the Caramel Layer:
- 1 cup of creamy almond butter or peanut butter
- 1/2 cup of pure maple syrup
- 1/3 cup of coconut oil melted
- 1 teaspoon of vanilla extract
For the Chocolate Topping:
- 1 1/2 cups of dark chocolate chips
- 2 tablespoons of coconut oil
- 1/2 cup of toasted walnuts or pecans chopped
- 1 tablespoon of flaky sea salt
Substitutions and Variations
If you do not have graham crackers you can use vanilla wafers or even crushed pretzels for a saltier base. If you have a nut allergy you can swap the almond butter for sunflower seed butter. For a vegan version just make sure your chocolate chips are dairy free and use maple syrup instead of honey.
Step-by-Step Instructions
Making these bars is all about the layers. Follow these steps to get the best results.
Step 1: Prepare the Pan
Line an 8×8 inch square baking pan with parchment paper. Leave a little bit of paper hanging over the edges. This makes it easy to lift the bars out later.
Step 2: Make the Crust
Put your graham crackers in a plastic bag and crush them with a rolling pin until they look like sand. In a medium bowl mix the crumbs with the melted butter and honey. Stir it until it feels like wet sand.
Step 3: Create the Caramel
In a separate bowl whisk together the almond butter and maple syrup and melted coconut oil. Add the vanilla. Keep whisking until it is very smooth. It will look like a thick gold sauce.
Step 4: Melt the Chocolate
Put the chocolate chips and coconut oil in a microwave safe bowl. Heat it for 30 seconds at a time. Stir between each heat session. Stop when it is glossy and thin.
Assembly
Now comes the fun part. Building the layers is how we get that beautiful look you see in professional bakeries.
- The Foundation: Pour the graham cracker mixture into your lined pan. Use the back of a large spoon to press it down very hard. You want it to be flat and firm. If you do not press hard enough the bars will crumble when you cut them.
- The Middle: Pour the caramel mixture over the crust. Use a spatula to spread it all the way to the corners. Tap the pan on the counter a few times to get rid of air bubbles.
- The Top: Carefully pour the melted chocolate over the caramel. Move the pan side to side so the chocolate covers everything.
- The Crunch: While the chocolate is still wet sprinkle your chopped toasted nuts all over the top. Add a pinch of flaky sea salt last. The salt makes the chocolate taste even better.
- The Chill: Place the pan in the freezer for at least one hour or the fridge for three hours. The bars need to be cold so they stay together.
Presentation Tips
When you are ready to serve lift the parchment paper to remove the whole block. Run a sharp knife under hot water and wipe it dry before cutting. This helps the knife glide through the cold chocolate without cracking it. Cut them into long thin rectangles for a high end look.
Storage and Make-Ahead Tips
These bars are great because they last a long time. You can make them a few days before you need them.
- In the Fridge: Store the bars in an airtight container for up to two weeks. Keep a piece of parchment paper between layers so they do not stick.
- In the Freezer: These bars freeze perfectly. They will stay fresh for up to three months. You can even eat them straight from the freezer for a very firm and cold treat.
- Serving: If they have been in the freezer let them sit on the counter for five minutes before eating. This lets the caramel soften just a little bit.
Recipe Variations
You can change this recipe to fit your mood.
- The Fruit Twist: Add a layer of sliced bananas on top of the caramel before adding the chocolate.
- The Coffee Kick: Stir a teaspoon of espresso powder into the melted chocolate for a mocha flavor.
- The Berry Blast: Use dried cranberries instead of nuts for a chewy and tart topping.
- The High Protein Version: Much like Greek Yogurt Brownies you can add a scoop of protein powder to the caramel layer if you want a snack that keeps you full longer.
Conclusion
Making delicious desserts does not have to be stressful. These No-Bake Chocolate Caramel Bars prove that you can make a stunning treat with just a few bowls and a little patience. They are perfect for kids to help with because there is no hot oven involved. Go ahead and try it out. Experiment with different nuts or different types of chocolate. The best part of cooking is making the recipe your own. Your friends and family will be amazed that you made these yourself.
FAQs
Are these bars healthy? These bars use natural fats from nuts and coconut oil. They also use maple syrup instead of white sugar. While they are still a treat they have more fiber and protein than a standard store bought candy bar.
What if my caramel layer is too runny? This usually happens if the coconut oil was not measured correctly or if the almond butter was very oily. Make sure to chill the bars in the freezer to help that layer firm up.
Can I use milk chocolate instead of dark chocolate? Yes you can. Milk chocolate is sweeter and dark chocolate is richer. Pick whichever one you like the most.
Do I have to toast the nuts? You do not have to but it is highly recommended. Toasting the nuts for five minutes in a pan makes them smell great and stay extra crunchy.
How do I get the perfect cut? Always use a warm knife. The heat melts the chocolate just enough so it does not shatter when the blade goes through.
Can I use this recipe to make Greek Yogurt Brownies? While the ingredients are different the idea of a healthy and easy treat is the same. If you love these bars you will likely enjoy the tangy and moist texture of brownies made with yogurt too. Both are great ways to enjoy chocolate without feeling weighed down.


