

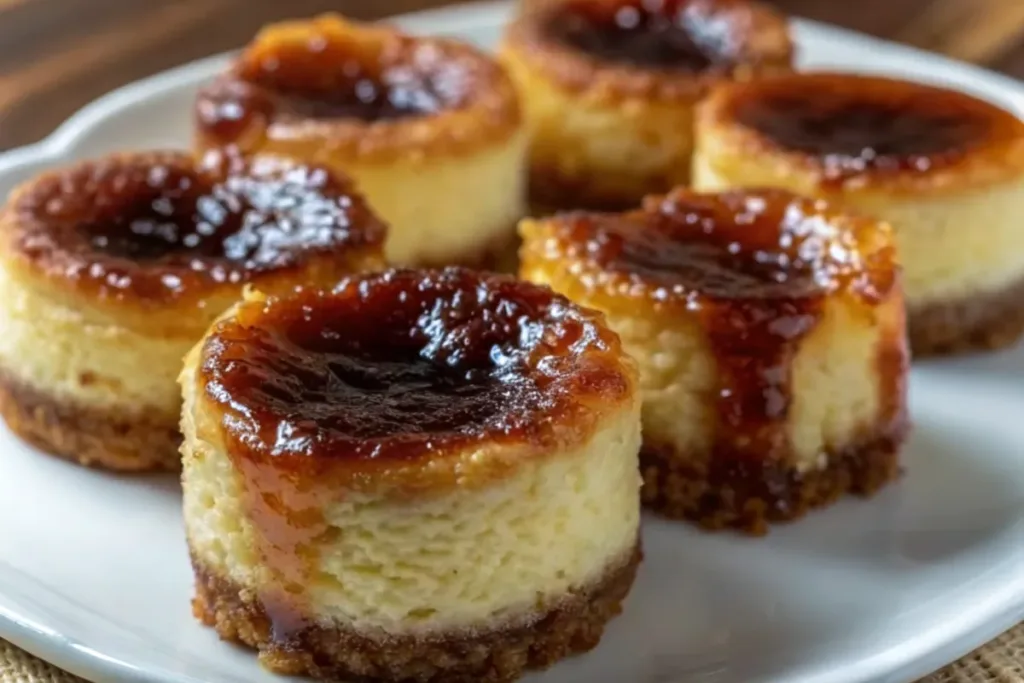
Have you ever wondered why a cheesecake that looks “burnt” could taste so irresistibly good? At first glance, the dark, caramelized top of a Basque cheesecake might make you think it’s overbaked. But here’s the secret: that toasty, almost burnt crust is exactly what makes this dessert unique. It locks in a creamy, melt-in-your-mouth center while giving each bite a deep caramel flavor. Now imagine all that goodness in a mini version—perfectly portioned, easy to serve, and even easier to enjoy.
Today, we’re diving into how to make the Mini Basque Burnt Cheesecake Recipe—a recipe that combines rich creaminess with simplicity, making it a dessert you’ll return to again and again.
Overview
Print
Mini Basque Burnt Cheesecake Recipe
- Total Time: 35 minutes
- Yield: 6 mini cheesecakes 1x
Description
These Mini Basque Burnt Cheesecakes are rich, creamy, and perfectly portioned. With their signature caramelized tops and melt-in-your-mouth centers, they’re the easiest cheesecakes you’ll ever bake—no water bath, no fuss, just rustic charm.
Ingredients
- 8 oz (225 g) cream cheese, room temperature
- 1/3 cup (70 g) granulated sugar
- 2 large eggs
- 1/2 cup (120 ml) heavy cream
- 1 tbsp all-purpose flour (or cornstarch for gluten-free)
- 1 tsp vanilla extract
- Pinch of salt
Instructions
- Prepare the tins: Line a muffin tin with parchment paper, letting it extend above the rim for rustic edges.
- Make the batter: Beat cream cheese until smooth. Add sugar and mix until combined. Add eggs one at a time, then stir in heavy cream, vanilla, salt, and flour. Mix until smooth but do not overbeat.
- Bake: Preheat oven to 400°F (200°C). Divide batter evenly into tins and bake 20–25 minutes, until tops are deeply golden brown and centers are slightly jiggly.
- Cool: Let rest in the tin for 10 minutes, then transfer to a rack to set before serving.
Notes
Best eaten the same day for a gooey center, or chilled overnight for a firmer texture. Serve plain, dusted with powdered sugar, or with berries. Freezer-friendly for up to 2 months.
- Prep Time: 10 minutes
- Cook Time: 25 minutes
- Category: Dessert
- Method: Baking
- Cuisine: Spanish-Inspired
Nutrition
- Serving Size: 1 mini cheesecake
- Calories: 210
- Sugar: 12g
- Sodium: 130mg
- Fat: 15g
- Saturated Fat: 9g
- Unsaturated Fat: 5g
- Trans Fat: 0g
- Carbohydrates: 15g
- Fiber: 0g
- Protein: 5g
- Cholesterol: 65mg
This recipe is special because it flips traditional cheesecake rules upside down. Most cheesecakes aim for a pale, smooth surface with no cracks, but Basque cheesecake is proud of its rustic, burnt top and creamy center. When made mini-sized, it becomes the perfect personal treat—ideal for parties, family dinners, or even just a cozy night in.
- Time required: About 10 minutes prep + 25 minutes baking
- Difficulty level: Easy, even for beginners
- Special features: No water bath needed, fewer ingredients than traditional cheesecake, and naturally gluten-free
If you’ve been afraid of baking cheesecakes before, this one will give you confidence.
Essential Ingredients
Here’s what you’ll need to make these rich and creamy mini cheesecakes:
- Cream cheese – The star of the recipe. Use full-fat for the creamiest texture.
- Granulated sugar – Adds sweetness and balances the tang of the cream cheese.
- Eggs – Provide structure and richness.
- Heavy cream – Makes the batter smooth and gives it that melt-in-your-mouth consistency.
- All-purpose flour – A small amount helps with structure, but you can leave it out for a gluten-free version.
- Vanilla extract – Adds warmth and depth of flavor.
- A pinch of salt – To balance the sweetness and enhance flavors.
Substitutions and Variations
- Cream cheese: If you don’t have cream cheese, mascarpone makes a richer, slightly sweeter alternative.
- Heavy cream: Half-and-half works if you want a lighter texture.
- Flour: Swap with cornstarch for a gluten-free option.
- Sweetener: Use honey, maple syrup, or coconut sugar for a different twist.
Step-by-Step Instructions
Step 1: Prepare your baking tins
- Line muffin tins with parchment paper. Allow the paper to extend above the rim; this gives the cheesecakes their signature rustic edges.
Step 2: Make the batter
- Beat the cream cheese until smooth. Add sugar and continue mixing until fully incorporated.
- Add eggs one at a time, mixing well after each addition.
- Stir in heavy cream, vanilla, salt, and sifted flour. Mix until smooth but don’t overbeat.
Step 3: Fill and bake
- Pour the batter evenly into the prepared tins.
- Bake in a preheated oven at 400°F (200°C) for about 20–25 minutes. The tops should be dark brown, almost burnt, while the centers remain slightly jiggly.
Step 4: Cool down
- Let them cool in the tin for 10 minutes. The tops may collapse slightly—that’s normal.
- Transfer to a wire rack and let them set before serving.
Assembly and Presentation
The beauty of these mini cheesecakes lies in their rustic look. You don’t need to fuss over perfect edges. The parchment paper gives them charming, crinkled sides.
For presentation:
- Dust lightly with powdered sugar.
- Serve with fresh berries to balance the richness.
- Pair with coffee or tea for an elegant touch.
Tip: If you want an extra glossy finish, drizzle caramel or chocolate sauce over the top.
Storage and Make-Ahead Tips
- Room temperature: Best enjoyed within a few hours of baking.
- Refrigerator: Store in an airtight container for up to 4 days. They’ll firm up in the fridge but still taste delicious.
- Freezer: Wrap individually in plastic wrap and freeze for up to 2 months. Thaw overnight in the fridge before serving.
Pro tip: If you like them gooier in the center, eat them the same day. If you prefer them firmer, chill overnight.
Recipe Variations
Want to put your own spin on this recipe? Try these ideas:
- Chocolate Mini Basque Cheesecake – Mix melted dark chocolate into the batter for a rich twist.
- Citrus Zest – Add lemon or orange zest for a refreshing flavor.
- Spiced Cheesecake – Stir in cinnamon, nutmeg, or cardamom for a warm, cozy version.
- Nutty Cheesecake – Fold in chopped pecans or walnuts before baking.
- Coffee Cheesecake – Add a teaspoon of instant coffee granules for a mocha-like flavor.
Conclusion
The Mini Basque Burnt Cheesecake Recipe proves that sometimes the most imperfect desserts are the most memorable. With their caramelized tops, creamy centers, and rustic charm, these little cheesecakes are guaranteed to impress without the stress. They’re easy enough for a beginner but elegant enough to serve at any gathering.
So why not give them a try? Play around with flavors, share them with loved ones, and enjoy the magic of this rustic Spanish dessert in mini form.
FAQs
Q: Why is it called Basque cheesecake?
A: It originated in the Basque region of Spain. The burnt top and creamy center have become its signature style.
Q: Do I need a water bath?
A: No, that’s the beauty of this recipe. The high heat creates the caramelized top without needing special steps.
Q: Can I make this ahead of time?
A: Yes, you can bake a day ahead and chill in the fridge. They’ll actually taste even better after setting.
Q: Is this recipe gluten-free?
A: Yes, if you skip the flour or replace it with cornstarch.
Q: How do I know when it’s done?
A: The tops should be dark brown and the centers should jiggle slightly when shaken.
Q: Can I make this healthier?
A: You can swap sugar for honey or stevia, and use Greek yogurt in place of some cream cheese for a lighter version.


