

Have you ever wondered why the frosting from a jar never quite captures that magical, cloud-like puffiness of a real marshmallow?
We have all been there. You spend hours baking the perfect batch of chocolate cupcakes, only to top them with a store-bought frosting that feels heavy, greasy, or way too sugary. It is a common struggle for home bakers. You want that tall, beautiful swirl that looks like it came from a professional bakery, but the stuff in the plastic tub just slides right off the cake.
The truth is that the secret to the perfect cupcake is not just the cake itself, but the topping. If you want a topping that is light, airy, and tastes like a literal dream, you need to make your own marshmallow frosting. Homemade marshmallow frosting is a game-changer. It is fluffy, it holds its shape perfectly, and it has a nostalgic flavor that reminds you of campfire s’mores and childhood treats. Best of all, it is much easier to make than most people think.
In this guide, we are going to walk through everything you need to know to create the best marshmallow frosting you have ever tasted. By the time you finish reading, you will be able to whip up a batch that is better than anything you can find on a grocery store shelf.
Print
Homemade Marshmallow Frosting: Better Than Store-Bought
- Total Time: 20 minutes
- Yield: 15 cupcakes 1x
Description
Have you ever wondered why the frosting from a jar never quite captures that magical, cloud-like puffiness of a real marshmallow? This homemade version is a game-changer. It is fluffy, glossy, holds its shape perfectly, and has a nostalgic flavor that reminds you of campfire s’mores. It is much lighter than buttercream and naturally fat-free!
Ingredients
- 4 large egg whites (at room temperature)
- 1 cup granulated sugar
- 1/4 cup light corn syrup (substitute with agave nectar or honey)
- 2 tablespoons water
- 1/4 teaspoon salt
- 1/4 teaspoon cream of tartar (or 1/2 teaspoon lemon juice)
- 1.5 teaspoons pure vanilla extract
Instructions
- Set Up a Double Boiler: Fill a small saucepan with about one inch of water and bring to a gentle simmer. Find a heat-proof glass or stainless steel bowl that fits snugly over the top without touching the water.
- Combine Ingredients: In the heat-proof bowl, whisk together the egg whites, sugar, corn syrup, water, salt, and cream of tartar until slightly foamy.
- The Heating Process: Place the bowl over the simmering water. Whisk constantly but gently for 3-5 minutes until the sugar is completely dissolved (160°F on a candy thermometer) and the mixture is smooth.
- Time to Whip: Remove from heat. Using a mixer on medium-high speed, beat the mixture for 7-10 minutes. It will turn from clear to a bright, snowy white.
- Final Peak: Continue whipping until the frosting is thick, glossy, and holds a stiff peak. Add the vanilla extract during the last minute of whipping.
Notes
Make sure your cupcakes or cakes are completely cool before frosting to prevent melting. For a professional look, use a kitchen torch to lightly brown the edges for a toasted marshmallow flavor. This frosting is best enjoyed the day it is made as it is at its absolute peak volume right after whipping.
- Prep Time: 10 minutes
- Cook Time: 10 minutes
- Category: Dessert
- Method: Double Boiler
- Cuisine: American
Nutrition
- Serving Size: 1 cupcake portion
- Calories: 65
- Sugar: 14g
- Sodium: 45mg
- Fat: 0g
- Saturated Fat: 0g
- Unsaturated Fat: 0g
- Trans Fat: 0g
- Carbohydrates: 16g
- Fiber: 0g
- Protein: 1g
- Cholesterol: 0mg
What makes this marshmallow frosting recipe special is the texture. Unlike a heavy buttercream that uses a lot of butter and powdered sugar, this recipe relies on whipped egg whites and a warm sugar syrup. This technique creates a “7-minute frosting” style that is glossy, bright white, and incredibly stable.
- Difficulty Level: Easy to Medium. If you can use a hand mixer and watch a thermometer, you can do this.
- Time Requirement: About 15 to 20 minutes from start to finish.
- Yield: Enough to generously frost 12 to 15 cupcakes or one 8-inch layer cake.
This recipe is perfect for beginners because it does not require a lot of fancy equipment, yet the results look like they were made by a pro.
Essential Ingredients
Before you start, make sure you have all your ingredients measured and ready to go. Having everything in place makes the process much smoother.
- Large Egg Whites: 4 whites (Make sure there is no yolk at all, or they won’t whip).
- Granulated Sugar: 1 cup.
- Light Corn Syrup: 1/4 cup (This keeps the frosting smooth and prevents sugar crystals).
- Water: 2 tablespoons.
- Salt: 1/4 teaspoon (This balances the sweetness).
- Cream of Tartar: 1/4 teaspoon (This helps the egg whites stay tall and strong).
- Pure Vanilla Extract: 1.5 teaspoons.
Substitutions and Variations
If you do not have some of these items, here are a few things you can try:
- Corn Syrup: If you prefer not to use corn syrup, you can substitute it with agave nectar or honey, though honey will add a slight floral flavor to the frosting.
- Cream of Tartar: If you do not have this, you can use 1/2 teaspoon of lemon juice or white vinegar. The goal is to provide a little bit of acid to stabilize the egg whites.
- Flavorings: While vanilla is the classic choice, you can swap it for almond extract, peppermint extract, or even a teaspoon of lemon zest for a different twist.
Step-by-Step Instructions
Making marshmallow frosting requires a bit of heat and a lot of air. Follow these steps carefully to get that perfect fluffy finish.
Step 1: Set Up a Double Boiler
You do not need a special pot for this. Simply find a heat-proof glass or stainless steel bowl that fits snugly over a small saucepan. Fill the saucepan with about one inch of water. Make sure the bottom of the bowl does not touch the water. Bring the water to a gentle simmer over medium heat.
Step 2: Combine Ingredients
In your heat-proof bowl, whisk together the egg whites, granulated sugar, corn syrup, water, salt, and cream of tartar. Whisk them until they are combined and look slightly foamy.
Step 3: The Heating Process
Place the bowl over the simmering water. Continue to whisk constantly but gently. You want to heat the mixture until the sugar has completely dissolved. If you have a candy thermometer, you are looking for a temperature of 160 degrees Fahrenheit. If you do not have a thermometer, rub a tiny bit of the mixture between your fingers. If it feels completely smooth and not gritty, it is ready. This usually takes about 3 to 5 minutes.
Step 4: Time to Whip
Carefully remove the bowl from the heat. Using a hand mixer or a stand mixer with the whisk attachment, begin beating the mixture on medium-high speed. As you whip, the mixture will turn from a clear yellow to a bright, snowy white.
Step 5: Adding Flavor
Continue whipping for about 7 to 10 minutes. The frosting should become very thick and glossy. When you lift the whisk, the frosting should hold a stiff peak that does not flop over. In the last minute of whipping, pour in your vanilla extract.
Assembly and Presentation
Once your marshmallow frosting is thick and glossy, it is time to put it on your baked goods. Because this frosting is so light, it is a dream to work with.
How to Build the Base
Make sure your cupcakes or cakes are completely cool before you start. If the cake is even a little bit warm, the frosting will start to melt and lose its fluffiness.
Piping Techniques
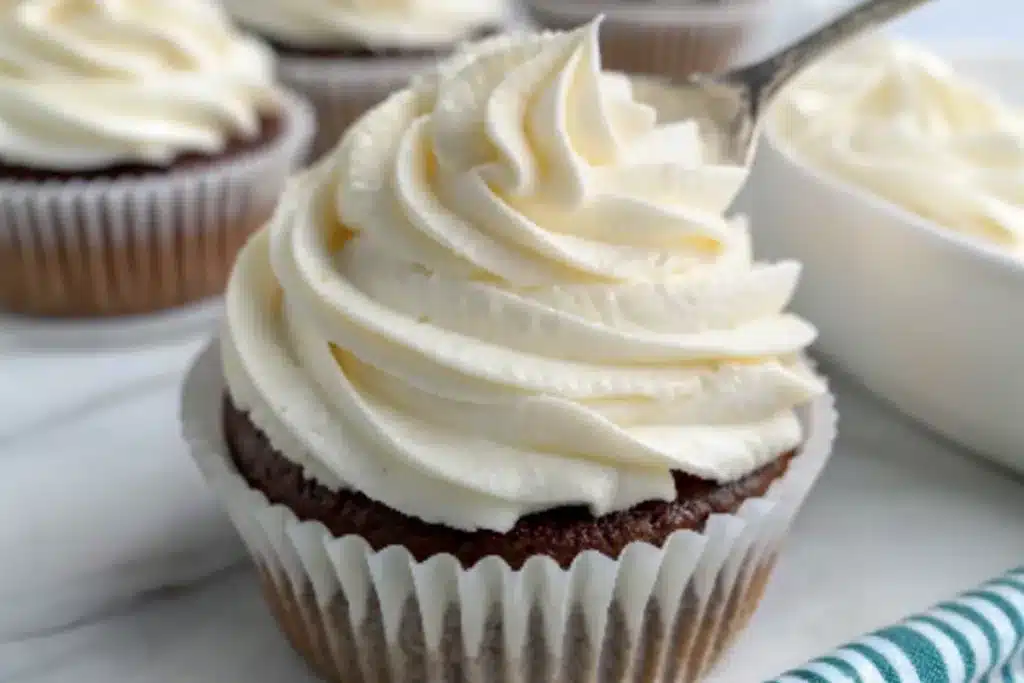
If you want that professional look seen in bakery windows, use a large piping bag with a star tip. Start in the center of the cupcake, move to the outer edge, and spiral back up to the middle in a circular motion. This creates a tall, beautiful mound of frosting.
Presentation Tips
- Toasted Look: Since this is marshmallow frosting, you can use a kitchen torch to lightly brown the edges of the frosting. This gives it a toasted marshmallow flavor and a beautiful golden-brown look.
- Sprinkles: Add sprinkles immediately after frosting, as the surface of the marshmallow frosting will set slightly as it sits.
- Chocolate Drizzle: A light drizzle of melted dark chocolate over the top creates a wonderful contrast against the white frosting.
Storage and Make-Ahead Tips
Homemade marshmallow frosting is best enjoyed the day it is made. However, you can store it if you have leftovers.
- Room Temperature: You can leave frosted cupcakes at room temperature in a cool dry place for up to one day.
- Refrigeration: If you need to keep them longer, place them in an airtight container in the fridge for up to 3 days. Note that the frosting may lose a little bit of its fluffiness over time.
- Make-Ahead: I do not recommend making this frosting days in advance. It is at its absolute best right after it is whipped. If you must make it ahead of time, keep it in a sealed container and give it a quick whisk before using it to bring back the volume.
- Reheating: Do not try to reheat this frosting in the microwave. The heat will cause the air bubbles to collapse and it will turn into a sticky liquid.
Creative Recipe Variations
Once you master the basic recipe, you can get creative with different versions of marshmallow frosting.
- Chocolate Marshmallow: Fold in 2 tablespoons of unsweetened cocoa powder during the last minute of whipping for a light chocolate cloud.
- Strawberry Fields: Use a teaspoon of strawberry extract and a drop of pink food coloring for a fruity, nostalgic treat.
- Mocha Swirl: Add a teaspoon of instant coffee powder to the sugar mixture before heating for a sophisticated coffee flavor.
- Confetti Marshmallow: Fold in a handful of rainbow sprinkles by hand at the very end to make a fun “birthday cake” style frosting.
Conclusion
Making your own marshmallow frosting is a rewarding experience that elevates your baking from ordinary to extraordinary. It is lighter than buttercream, tastier than store-bought tubs, and much more versatile than you might expect. Whether you are topping chocolate cupcakes or filling a layer cake, this recipe provides a beautiful, glossy finish that will impress your friends and family.
Do not be afraid to experiment with different flavors or even try toasting the edges with a torch. Cooking is all about having fun and finding what tastes best to you. Once you taste the difference that fresh ingredients make, you will never want to go back to the jar again.
Frequently Asked Questions
Is marshmallow frosting healthy?
While this is still a sweet treat, homemade marshmallow frosting is naturally fat-free because it does not use butter or oil. It is also lower in calories per tablespoon than traditional butter-based frostings.
Why is my frosting runny?
This usually happens if the egg whites were not whipped long enough or if the sugar mixture did not reach a high enough temperature. Make sure you whip until the peaks are stiff and the bowl feels cool to the touch.
How long does it take to prepare?
The total preparation time is about 20 minutes. It is a very quick way to add a high-quality finish to your desserts.
Can I use this for a wedding cake?
Because this frosting is very soft and fluffy, it is best for cupcakes or simple layer cakes. It is not recommended for heavy tiered cakes that need to sit out for many hours in a warm environment.
Can I make this without a mixer?
It is very difficult to make this by hand. You would need to whisk very fast for about 10 minutes straight. A hand mixer or stand mixer is highly recommended to get the right amount of air into the frosting.
Is it safe to eat the egg whites?
Yes! Because we heat the egg whites and sugar over a double boiler to 160 degrees Fahrenheit, the egg whites are cooked and safe to eat.
Can I add food coloring?
Yes, you can add gel food coloring during the last minute of whipping. Gel works better than liquid coloring because it does not change the consistency of the frosting.
Does it taste like actual marshmallows?
Yes! It has the exact same flavor as the inside of a fresh marshmallow. It is very sweet and has a strong vanilla aroma.


