

Have You Ever Tasted a Cake So Decadent It Made You Forget Everything Else?
If you answered no, then you are about to have your mind blown. Many people think that a truly incredible, professional-quality chocolate layer cake is something only found in high-end bakeries. They believe that getting those perfect layers, that rich flavor, and that shiny finish is impossible at home. But what if I told you that you could create a show-stopping cake in your own kitchen? A cake that is so deep and rich it feels like a warm hug for your taste buds? This isn’t just a fantasy. This is my Velvety Chocolate Layer Cake with Ganache and a Chocolate Chip Crust, and it’s about to change your baking game forever.
We’re not just talking about any chocolate cake. We’re going deep. We’re going triple-deep. This cake is for the serious chocolate lovers who crave that intense, fudgy, almost-gooey texture and that shiny, perfect ganache top that just calls your name. And that chocolate chip crust? It’s not just a decoration; it’s a playful textural surprise that makes every single bite special. The best part is that I am going to show you exactly how to do it, step by step, so you can surprise everyone at your next gathering. This is not a quick-fix box cake. This is a labor of love that is absolutely worth every minute.
What Makes This Chocolate Layer Cake Special?
Print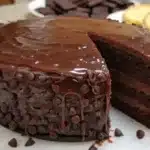
Velvety Chocolate Layer Cake with Ganache & Chocolate Chip Crust
- Total Time: 5 hours
- Yield: 12 servings 1x
- Diet: Vegetarian
Description
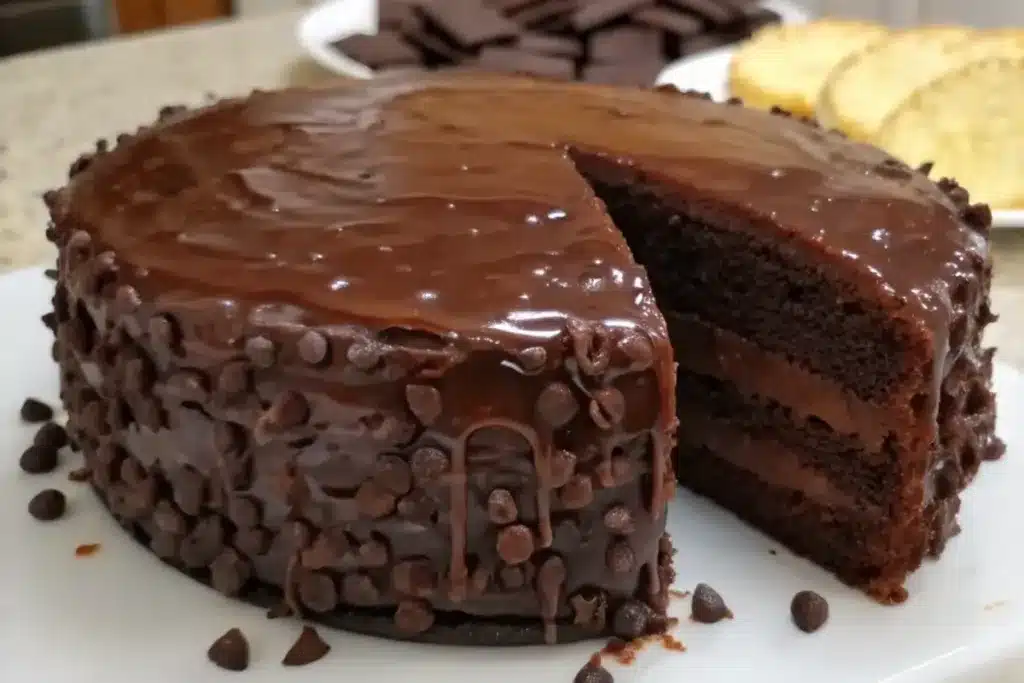
This Velvety Chocolate Layer Cake is a show-stopping, triple-chocolate masterpiece featuring three fudgy layers, a silky chocolate frosting, and a glossy ganache finish. Studded with a chocolate chip crust, it offers the perfect balance of deep cocoa flavor and playful texture for any special occasion.
Ingredients
- 2 ¼ cups all-purpose flour
- 2 cups granulated sugar
- ¾ cup unsweetened cocoa powder (Dutch-processed preferred)
- 2 teaspoons baking powder
- 1 ½ teaspoons baking soda
- 1 teaspoon salt
- 1 cup buttermilk
- ½ cup vegetable oil
- 2 large eggs, room temperature
- 2 teaspoons vanilla extract
- 1 cup strong hot coffee
- For the Frosting: 1 cup unsalted butter, ¾ cup cocoa powder, 2 ½ cups powdered sugar, ⅓ cup heavy cream, 1 tsp vanilla, ¼ tsp salt
- For the Ganache: 1 cup semi-sweet chocolate chips, ½ cup heavy cream
- For the Crust: 2 cups semi-sweet chocolate chips
Instructions
- Bake the Cake: Preheat oven to 350°F. Sift dry ingredients, then whisk in buttermilk, oil, eggs, and vanilla. Add hot coffee and mix until smooth. Divide into three 8-inch pans and bake for 30-35 minutes.
- Prepare the Frosting: Cream butter and cocoa powder. Gradually add powdered sugar and heavy cream until fluffy.
- Assemble the Layers: Level the cakes and stack with frosting between each layer. Apply a thin crumb coat and chill for 20 minutes before adding the final frosting layer.
- Glaze with Ganache: Melt 1 cup chips with ½ cup cream until glossy. Pour over the chilled cake, letting it cascade slightly over the edges.
- Add the Crust: Press remaining chocolate chips into the sides of the cake while the frosting is still slightly soft.
- Final Set: Chill for at least one hour before serving.
Notes
Chill cake layers overnight before leveling to make them easier to handle. Use Dutch-processed cocoa for a deeper, smoother chocolate flavor. For the best texture, let the cake sit at room temperature for 1-2 hours before serving.
- Prep Time: 45 minutes
- Cook Time: 40 minutes
- Category: Dessert
- Method: Baking
- Cuisine: American
Nutrition
- Serving Size: 1 slice
- Calories: 580
- Sugar: 45g
- Sodium: 320mg
- Fat: 32g
- Saturated Fat: 18g
- Trans Fat: 0g
- Carbohydrates: 68g
- Fiber: 4g
- Protein: 7g
- Cholesterol: 65mg
This recipe is special because it focuses on achieving the most velvety texture possible without being overly sweet. It has three distinct layers of rich, fudgy chocolate cake, glued together by a simple but perfect chocolate frosting. The top is covered in a beautiful, glossy chocolate ganache, and the entire outside is studded with semi-sweet chocolate chips. It is a true triple-chocolate experience.
This is a Chocolate Layer Cake that makes a statement. It’s perfect for birthdays, anniversaries, or any celebration where you want to impress.
Time Requirement: This is a project cake. You should plan for about:
- Prep Time: 45 minutes
- Bake Time: 40 minutes (per batch)
- Cooling Time: 1.5 hours (essential!)
- Assembly Time: 30 minutes
- Chilling Time: 1 hour (for the final set)
Total dedication time: About 4.5 to 5 hours. But remember, a lot of that is just waiting for things to cool or bake, so you are not busy the entire time.
Difficulty Level: I would rate this as Intermediate. If you have baked a cake before, you can do this. The most “tricky” part is patience. Cutting the layers can be a challenge, and achieving the perfectly smooth sides and shiny ganache takes a gentle touch, but I will give you all the tricks.
The All-Important Ingredients List
To make this masterpiece, you will need some common ingredients, but also a few key quality items. Using high-quality cocoa powder and chocolate will make a HUGE difference in the final taste.
For the Chocolate Cake Layers:
- 2 ¼ cups all-purpose flour (280g)
- 2 cups granulated sugar (400g)
- ¾ cup unsweetened cocoa powder, Dutch-processed is preferred (90g)
- 2 teaspoons baking powder
- 1 ½ teaspoons baking soda
- 1 teaspoon salt
- 1 cup buttermilk (this is crucial for moisture!)
- ½ cup vegetable oil (makes the cake fudgy)
- 2 large eggs, room temperature
- 2 teaspoons vanilla extract
- 1 cup strong, hot coffee (or boiling water)
For the Simple Chocolate Frosting (between the layers):
- 1 cup unsalted butter, softened (2 sticks)
- ¾ cup unsweetened cocoa powder, sifted (90g)
- 2 ½ cups powdered sugar, sifted (300g)
- ⅓ cup heavy cream (or a little more, for texture)
- 1 teaspoon vanilla extract
- ¼ teaspoon salt
For the Shiny Chocolate Ganache (the top coating):
- 1 cup semi-sweet chocolate chips (170g)
- ½ cup heavy cream
For the Decoration:
- 2 cups semi-sweet chocolate chips (about 12 oz, or more depending on your patience)
Variations and Substitutions
Baking is science, but we can play a little!
- Flour: For a slightly more delicate crumb, you can use cake flour, but all-purpose flour works perfectly for that “velvety” and “fudgy” feel.
- Cocoa Powder: Dutch-processed cocoa gives a deeper color and smoother flavor, but regular unsweetened cocoa powder will work fine. Your cake will just be a lighter shade of brown.
- Coffee: Many people are scared of using hot coffee in chocolate cake, but it will not taste like coffee. The hot liquid helps “bloom” the cocoa powder, releasing its deepest flavor, and the coffee just enhances the chocolate. If you are very opposed, you must use boiling water instead.
- Buttermilk: This is non-negotiable for that moist, velvety texture! If you don’t have buttermilk, you can make a quick substitute: add 1 tablespoon of vinegar (white or apple cider) or lemon juice to 1 cup of regular milk and let it sit for 5 minutes until it curdles slightly. This is not as rich as the real thing, but it will work.
- Oils: Do not use olive oil; its flavor is too strong. Use a neutral oil like vegetable, canola, or grapeseed oil.
- Eggs: If you need an egg-free substitute, you can try commercial egg replacers, but the texture might be slightly different. For a recipe this large, flax eggs may struggle.
Your Detailed Guide: How to Make This Chocolate Layer Cake
This process has several distinct parts. Don’t rush! Take your time with each one.
Part 1: The Cake Layers
- Prep your kitchen. Before you do anything else, preheat your oven to 350°F (175°C). The temperature needs to be exact. Prepare three 8-inch round cake pans by greasing them with butter or cooking spray, then dust them with a little cocoa powder or line the bottoms with parchment paper. This ensures your cakes don’t stick.
- Mix the dry ingredients. In a large bowl (or the bowl of a stand mixer), sift together the flour, sugar, cocoa powder, baking powder, baking soda, and salt. Sifting prevents clumps. Use a whisk to combine them well.
- Mix the wet ingredients. In a separate bowl (or a large measuring cup), whisk together the buttermilk, oil, eggs, and vanilla. Make sure they are combined.
- Combine wet and dry. Add the wet mixture to the dry mixture. Use your mixer on low speed (or a sturdy whisk) and blend just until everything is combined. DO NOT OVERMIX. Stop as soon as you don’t see large pockets of dry flour.
- The Secret Step: Add the Hot Coffee. With your mixer still on the lowest speed possible, slowly and steadily stream in the strong, hot coffee (or boiling water). Stop and scrape down the sides of the bowl. The batter will become very, very thin. This is correct! Mix for about 30 seconds more until it is smooth.
- Bake the cakes. Divide the batter evenly among the three prepared cake pans. Bake for 30–35 minutes, or until a toothpick inserted in the center of the cake comes out clean.
- Crucial Cooling! Let the cakes cool in the pans for about 10–15 minutes. This is critical—the cake is fragile right out of the oven. Then, gently turn them out onto a wire cooling rack. Let them cool completely. For this cake, the layers must be completely cold before you assemble. You can even wrap the cooled layers in plastic wrap and chill them in the fridge overnight to make them easier to handle. This makes a huge difference in cutting.
Part 2: The Simple Chocolate Frosting
This frosting is not fancy. It’s a workhorse that provides stability and flavor between the layers.
- Cream the butter. In a large bowl (with your hand mixer or a stand mixer), beat the softened butter until it is smooth and creamy. This should take about 3 minutes.
- Add the cocoa powder. Add the sifted cocoa powder to the butter. Beat on low speed until it is mostly incorporated. This creates a rich “base.”
- Alternate powdered sugar and cream. Add about 1 cup of the sifted powdered sugar and 1 tablespoon of the heavy cream. Beat on low. Repeat until all the sugar and most of the cream are added.
- Finish the texture. Add the vanilla and salt. Crank up the speed to medium-high and beat for 3–5 minutes. Your goal is a frosting that is fluffy, spreadable, but can hold its shape. If it feels too stiff, add a tiny bit more cream. If it feels too soft, add another tablespoon of powdered sugar.
Let’s Build the Ultimate Chocolate Layer Cake
This is where the magic happens! Get all your components ready.
- Level your cakes (Optional, but highly recommended). If your cakes have large domes, use a serrated knife (like a long bread knife) to carefully saw the tops off so each layer is flat and even. This is why chilling the layers first is so helpful.
- Add the base layer. Place one cake layer on your serving plate or a cardboard cake round. Place about 1 cup of your chocolate frosting in the center. Use an offset spatula (the flat, angled kind) to spread it evenly all the way to the edges.
- Stack and frost again. Carefully place the second cake layer directly on top. Repeat with another 1 cup of frosting, spreading it evenly.
- Top layer. Add the third cake layer, placing it cut-side down (the bottom of the cake is now the very top, which ensures a perfect, flat top). Press down gently on all sides to make sure the stack is straight.
- The Crumb Coat (A Pro Secret!). Use most of your remaining frosting to apply a very thin, “rough” layer over the entire outside (top and sides) of the cake. This is called a crumb coat. Its only job is to seal in the crumbs. Smooth it as best as you can, then place the entire cake in the refrigerator for 20–30 minutes to let this thin layer set. This makes the next step much cleaner.
- Final Frosting. Once the crumb coat is set, use any remaining frosting (or make a little more if you are running low) to create a final, slightly thicker, smooth layer over the entire cake. This layer doesn’t have to be perfect, as we are going to cover the sides with chips! Smooth it well enough that the cake’s structure is covered. Return the cake to the fridge to keep it chilled while you make the ganache.
Add the Finishing Touches
Part 1: The Ganache
This shiny coating is the easiest thing to make!
- Combine. Place the 1 cup of chocolate chips in a small, heatproof glass bowl. Pour the ½ cup heavy cream over the chips.
- Melt. Microwave the bowl on high for 30 seconds. Stop. Whisk gently. Microwave for another 15 seconds. Repeat in 15-second intervals, whisking gently after each one, until all the chips are completely melted and the mixture is smooth and glossy. Do not overheat, or it can split.
- Wait. Let the ganache sit for about 5–10 minutes at room temperature. It should thicken slightly but still be pourable. If it’s too thin, it will just run off the cake. If it’s too thick, you won’t be able to spread it.
Part 2: Decorating
- Pour and Spread. Get your chilled cake out of the fridge. Pour the warm ganache right onto the center of the top of the cake. Use your clean offset spatula to gently nudge the ganache toward the edges, letting it cascade just a tiny bit over the top edge. It should be smooth and cover the top completely.
- The Chocolate Chip Crust. This is the final, grand act. Grab your bowls of chocolate chips. While the ganache on the top is still a bit soft, and the side frosting is not completely set, gently take a handful of chocolate chips and press them lightly into the frosting on the sides of the cake. Work your way around the entire cake, pressing chips into the side from the bottom to the top edge. This takes patience! If your hand gets warm, switch bowls of chips. Place any dropped chips back in the bowl to keep things tidy.
- Final Chill. Once the entire outside is covered in chips, return the magnificent cake to the refrigerator for at least one hour to allow the ganache to set completely and all the layers to firm up.
Storage and Make-Ahead Tips for This Masterpiece
You have put in all this effort, so let’s make sure this Chocolate Layer Cake stays perfect.
- Make-Ahead Layers: The cake layers are actually better if made a day ahead! Once cooled, wrap them tightly in plastic wrap and store them in the refrigerator. This allows the fudgy texture to develop, and the cold layers are much easier to frost.
- Make-Ahead Frosting: You can make the frosting up to 3 days ahead. Store it in an airtight container in the fridge. Before you assemble the cake, bring the frosting to room temperature and whip it for a minute to restore its light texture.
- Assembled Cake Storage: Once the cake is fully assembled and chilled, it can be kept at room temperature for about 12 hours (if the ganache is fully set). For longer storage, keep it in an airtight cake carrier or a large dome covered in plastic wrap in the refrigerator. This cake is so moist it will keep for up to 5 days in the fridge.
- Serving Advice: This is a fudgy, rich cake. For the absolute best flavor and texture, remove the cake (or just the slices you are serving) from the refrigerator 1–2 hours before you plan to eat. A cold chocolate cake is still delicious, but a slightly softened, room-temperature slice is when you will truly experience that velvety magic.
- Freezing: You can freeze the fully assembled cake for up to 2 months. To do this, freeze the cake uncovered for 2 hours until the outside is hard. Then wrap the entire cake tightly in plastic wrap, and then again in aluminum foil. Thaw the cake overnight in the refrigerator, and then bring it to room temperature before serving.
Quick and Creative Recipe Variations
This cake is already perfect, but you can have some fun with it!
- Peanut Butter Layer: Instead of the chocolate frosting, create a simple peanut butter buttercream to go between the cake layers.
- Coffee Infusion: If you really want to highlight the coffee note, use strong brewed coffee and 1 tablespoon of instant espresso powder in the cake batter, and perhaps add a dash of espresso powder to your simple frosting.
- White Chocolate Contrast: For a visual pop, use a white chocolate ganache on top and stick to standard semi-sweet chips on the sides.
- Fresh Fruit: A layer of seedless raspberry jam spread over the chocolate frosting between the cake layers adds a tart complexity.
- Mini-Chip Sides: Use mini chocolate chips on the sides instead of regular ones for a slightly more delicate look.
Go Ahead and Impress Yourself
Creating this triple-threat Velvety Chocolate Layer Cake with Ganache and a Chocolate Chip Crust is a true baking victory. It shows patience, precision, and an intense dedication to the perfect chocolate experience. The combination of the deep, fudgy cake layers, the stability of the simple frosting, and the playful textural pop of the chocolate chip sides is unbeatable. You can absolutely achieve this professional, “bakery quality” look and taste right in your own kitchen. Don’t be intimidated. Follow the steps, take your time, and enjoy the delicious journey. Your friends and family will be utterly amazed, and you will have made the ultimate chocolate cake that everyone will ask for. Now go on, experiment, bake, and savor every bite.
Frequently Asked Questions About Chocolate Layer Cake
Can I make this as two 9-inch cakes instead? Yes, you can. Your cakes will just be a little thinner and your layers wider. Reduce the baking time by 3–5 minutes. You might not have enough frosting for a thick filling, so be mindful.
What are the health benefits of this cake? This is a rich dessert, so think of it as a treat! However, the dark cocoa powder in the cake does contain some antioxidants. Using quality ingredients also means you are avoiding artificial preservatives. Enjoy it for the happy feelings it creates!
How can I make this in less than 5 hours? The main “wait time” is the cooling of the layers. You can significantly shorten your perceived effort time by baking the cake layers the night before. If the cakes are already cold in the fridge, the frosting, ganache, and assembly only take about 1.5 to 2 hours. This splits the project into two easier days.
Can I use milk chocolate chips instead? Yes, but be warned that your ganache might not set as firmly. Semi-sweet chocolate chips (55–60% cocoa) are the standard for ganache because they set up properly. Milk chocolate will be much softer and much, much sweeter. It’s a matter of preference, but know that it might be a messier cake!
What is Dutch-processed cocoa powder? Regular cocoa powder is natural and acidic. Dutch-processed cocoa has been treated with an alkali to neutralize its acidity. This results in a cocoa that is deeper in color, smoother (less “sharp”) in flavor, and mixes easier into liquids. It’s the standard for professional, rich-flavored chocolate bakes. If you can’t find it, don’t sweat it, but it’s worth the search!
My ganache looks greasy. What happened? This means your ganache “split” or “broke.” This usually happens if the cream was too hot when you poured it over the chips, or if you whisked it too aggressively. To fix it, try adding just one tablespoon of warm milk or water and whisking it very gently. If that doesn’t work, you might need to start again with fresh chips.
Is this cake super sweet? Surprisingly, no. Because it uses dark cocoa and semi-sweet chips, it has a very deep, rich chocolate flavor that is not balanced by excessive sugar. This allows the complex flavors of the chocolate to really shine. It’s a sophisticated kind of decadent.


