
Have you ever wondered how something that looks so fancy could actually be one of the easiest holiday treats to make? That’s exactly what happens with Chocolate Peppermint Bark — a dessert that feels gourmet but comes together with just a few ingredients and minimal effort. If you love the combination of rich chocolate and cool peppermint, you’re in for a real treat. Let’s explore how to make this festive favorite that’s perfect for gifts, dessert platters, or simply satisfying your sweet tooth.
What Makes This Recipe Special
Print
How to Make Chocolate Peppermint Bark: A Festive Treat That’s Easier Than You Think
- Total Time: 1 hour
- Yield: 12 servings 1x
Description
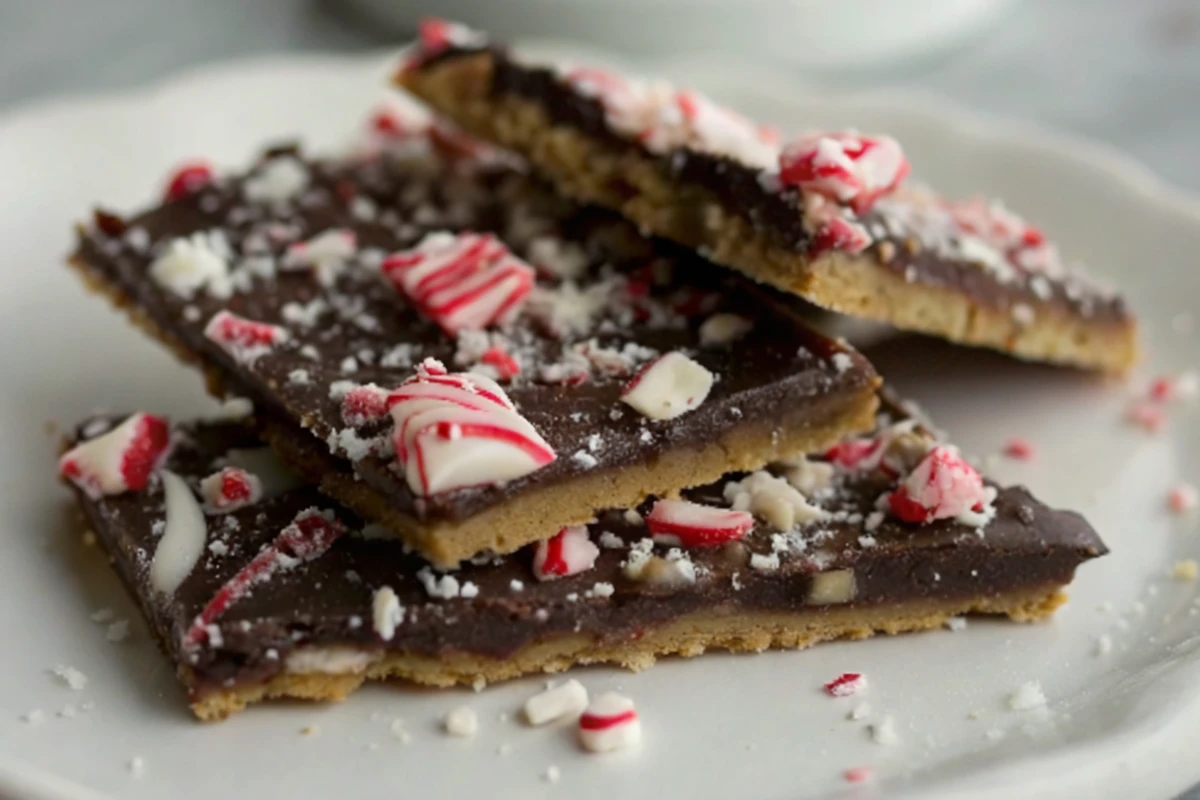
This Chocolate Peppermint Bark is a festive and easy holiday treat that combines layers of smooth dark and white chocolate topped with crunchy candy cane pieces. With just a few ingredients and no baking required, it’s the perfect homemade gift or sweet snack to celebrate the season.
Ingredients
- 12 ounces dark or semisweet chocolate, chopped
- 12 ounces white chocolate, chopped
- 1/2 teaspoon peppermint extract
- 1/3 cup crushed candy canes or peppermint candies
- Optional: sea salt, chopped nuts, or sprinkles for garnish
Instructions
- Prepare the Pan: Line a baking sheet with parchment paper or foil to prevent sticking.
- Melt the Dark Chocolate: Chop and melt the dark chocolate in a microwave-safe bowl in 30-second intervals, stirring until smooth. Stir in half the peppermint extract.
- Create the Base Layer: Spread the melted dark chocolate evenly on the prepared baking sheet (about 1/4-inch thick). Chill for 10 minutes until slightly firm but not fully set.
- Melt the White Chocolate: Melt the white chocolate the same way, then stir in the remaining peppermint extract.
- Layer and Swirl: Pour the melted white chocolate over the dark chocolate layer. Gently spread to cover. For a marbled effect, swirl with a knife before it sets.
- Add Toppings: Sprinkle crushed candy canes evenly over the top. Press lightly to make them stick.
- Chill and Break: Refrigerate for 30–45 minutes, or until fully firm. Once set, break the bark into pieces and enjoy.
Notes
Store Chocolate Peppermint Bark in an airtight container at room temperature for up to 2 weeks, or refrigerate for longer freshness. To make ahead, prepare and chill up to 3 weeks before serving or gifting. For variety, try adding nuts, drizzling caramel, or using milk chocolate instead of dark.
- Prep Time: 15 minutes
- Cook Time: 0 minutes
- Category: Dessert
- Method: No-Bake
- Cuisine: American
Nutrition
- Serving Size: 1 piece (about 1 oz)
- Calories: 180
- Sugar: 18g
- Sodium: 35mg
- Fat: 10g
- Saturated Fat: 6g
- Unsaturated Fat: 4g
- Trans Fat: 0g
- Carbohydrates: 20g
- Fiber: 1g
- Protein: 2g
- Cholesterol: 5mg
Chocolate Peppermint Bark is one of those holiday classics that never go out of style. The best part? It requires no baking, just melting, layering, and chilling. You’ll only need a handful of ingredients to make it — dark chocolate, white chocolate, and crushed candy canes — yet the end result looks elegant and tastes like something from a candy shop.
It’s also incredibly versatile. You can add nuts, drizzle caramel, or even swap chocolates to make it your own. Plus, it’s a great recipe for kids or beginners since it’s nearly impossible to mess up.
Time requirement:
- Prep time: 15 minutes
- Chill time: 30–45 minutes
- Total time: About 1 hour
Difficulty level: Easy
This recipe is perfect for those who want a quick, festive dessert that delivers both flavor and beauty without the stress of baking.
Essential Ingredients
Here’s what you’ll need to make classic Chocolate Peppermint Bark:
- 12 ounces dark or semisweet chocolate – This forms the base layer and balances the sweetness of the white chocolate.
- 12 ounces white chocolate – Smooth and creamy, it provides a striking color contrast and pairs beautifully with peppermint.
- 1/2 teaspoon peppermint extract – Adds that refreshing minty flavor.
- 1/3 cup crushed candy canes or peppermint candies – Gives crunch, texture, and festive color.
Optional Add-ins or Substitutions:
- Chocolate alternatives: You can use milk chocolate instead of dark for a sweeter base or swap in bittersweet chocolate for a richer taste.
- Toppings: Add crushed cookies, sprinkles, or chopped nuts for variety.
- Flavor twists: Replace peppermint extract with vanilla or almond extract for a different spin.
Step-by-Step Instructions
Follow these simple steps to create your own batch of Chocolate Peppermint Bark:
Step 1: Prepare Your Pan
Line a baking sheet with parchment paper or foil. This prevents sticking and makes it easy to lift out the bark later.
Step 2: Melt the Dark Chocolate
Chop your dark chocolate into small, even pieces. Melt it using one of these methods:
- Microwave method: Heat in 30-second intervals, stirring between each until smooth.
- Double boiler method: Place a heatproof bowl over simmering water and stir until melted.
Once melted, stir in half of the peppermint extract for flavor.
Step 3: Spread the First Layer
Pour the melted dark chocolate onto your prepared baking sheet and spread it evenly into a rectangle about 1/4 inch thick. Place the sheet in the refrigerator for about 10 minutes or until slightly firm but not fully set.
Step 4: Melt the White Chocolate
While the dark layer chills, melt your white chocolate using the same method. Stir in the remaining peppermint extract.
Step 5: Layer and Swirl
Pour the melted white chocolate over the dark layer. Gently spread it to cover the surface. If you want a swirled look, drag a knife through the two layers before the white chocolate hardens.
Step 6: Add the Candy Cane Topping
Immediately sprinkle the crushed candy canes over the top before the white chocolate begins to set. Press lightly so they stick.
Step 7: Chill and Break
Place the pan in the refrigerator for 30–45 minutes until completely firm. Once set, lift the bark out by the edges of the parchment paper and break it into pieces. The uneven edges are part of the charm!
Assembly and Presentation Tips
Presentation matters, especially when you’re gifting or sharing this bark. Here’s how to make it look beautiful:
- Uniform pieces: Score the bark lightly with a knife before chilling to create even squares.
- Gift packaging: Wrap individual pieces in cellophane bags or place them in decorative tins.
- Serving idea: Pile the bark on a festive platter with a dusting of extra crushed peppermint for a wintry touch.
If you’re hosting a holiday party, serve Chocolate Peppermint Bark alongside hot cocoa, coffee, or peppermint mochas for the ultimate pairing.
Storage and Make-Ahead Tips
One of the best things about this recipe is how well it stores.
- Room temperature: Store in an airtight container for up to 2 weeks in a cool, dry place.
- Refrigerator: Keeps fresh for up to 3 weeks if your kitchen is warm.
- Freezer: You can freeze it for up to 3 months. Just layer parchment paper between pieces to prevent sticking.
When ready to serve, let it sit at room temperature for a few minutes so it’s easier to bite into.
Make-ahead tip: Since it stays fresh for weeks, you can prepare Chocolate Peppermint Bark well before the holidays. It’s perfect for gifting or last-minute dessert emergencies.
Recipe Variations
There are endless ways to customize Chocolate Peppermint Bark to suit your taste:
- Triple Chocolate Bark: Use layers of dark, milk, and white chocolate for a stunning effect.
- Salted Peppermint Bark: Sprinkle a pinch of sea salt on top to balance the sweetness.
- Nutty Bark: Add chopped almonds, pistachios, or pecans for crunch.
- Cookies and Cream Bark: Mix in crushed chocolate sandwich cookies before spreading the white chocolate layer.
- Vegan Peppermint Bark: Use dairy-free chocolate and vegan peppermint candies.
- Spiced Bark: Add a dash of cinnamon or espresso powder to the dark chocolate for a warm twist.
These variations keep the recipe fresh and exciting every year.
Health Benefits of Chocolate Peppermint Bark
While this treat is certainly indulgent, there are a few hidden benefits:
- Dark chocolate is rich in antioxidants and may boost mood and heart health.
- Peppermint aids digestion and adds a refreshing flavor without adding calories.
- Portion control is easy since bark can be broken into small, satisfying pieces.
So yes, you can enjoy this dessert guilt-free when eaten in moderation.
Conclusion
Chocolate Peppermint Bark proves that you don’t need complicated techniques or fancy tools to create something beautiful and delicious. With just a few ingredients and a little melting magic, you can whip up a treat that’s festive, flavorful, and perfect for any holiday celebration.
Whether you’re making it for your family, giving it as a gift, or keeping it all to yourself (no judgment here), this bark delivers joy in every bite. So go ahead — grab your chocolate, crush those candy canes, and create a batch of homemade happiness today.
FAQs
1. Can I use peppermint oil instead of extract?
Yes, but peppermint oil is much stronger than extract. Use only a few drops to avoid overpowering the chocolate.
2. Why did my layers separate when I broke the bark?
If the bottom layer was too cold when you added the second layer, they might not bond well. Let the first layer set partially — not fully — before adding the next.
3. Can I use candy melts instead of chocolate?
You can, but the flavor won’t be as rich. Real chocolate gives the best taste and texture.
4. How do I crush candy canes easily?
Place them in a sealed plastic bag and crush gently with a rolling pin or the bottom of a heavy pan.
5. How far in advance can I make Chocolate Peppermint Bark?
You can make it up to three weeks ahead and store it in an airtight container. It’s one of the best make-ahead desserts for the holidays.
6. What if my chocolate seizes or becomes grainy?
This usually happens when moisture gets into melted chocolate. To fix it, stir in a teaspoon of vegetable oil until smooth again.
Homemade Chocolate Peppermint Bark is a holiday must-have — simple, festive, and irresistibly good. With its satisfying crunch, minty sweetness, and elegant look, it’s sure to become one of your go-to seasonal desserts.


